Full Analysis to License Generation Process of Github Enterprise
overview
Github Enterprise is a code hosting and project collaboration platform tailored by Github for enterprise users. It provides two different deployment methods: public cloud and private cloud. This article will explain in detail the process of generating and verifying the Github Enterprise (hereafter referred to as GHE) license and the idea of reverse analysis, and at the same time share the one-click registration machine I wrote, which is ready to use out of the box. I hope that some ideas shared in this article will also provide some help for you to quickly find breakthroughs in Linux system forensics, application reverse analysis, and authorization bypass.
The interface of Github Enterprise is exactly the same as that of Github, and it contains almost all the features of Github (the only missing feature I see is Discussion in the project page), and additionally provides other advanced features that Github does not have. To list a few that impress me.
- SAML/CAS/LDAP SSO (no OAuth)
- Behavior auditing (very fine-grained!)
- Access rights control (including the usage rights of various functions such as Fork, Issue, PR, etc., project visibility, etc.)
- Code security scanning (Github Advanced Security, including code scanning, password private key scanning, and dependent libraries)
- Interconnect with Github (like Bing, you can search internal enterprise data on Github)
Through this article, readers can learn about the following:
- The installation and operation process of Github Enterprise (as for the use of GHE functions, it is basically the same as Github, you can try it yourself).
- Github Enterprise’s authorization verification mechanism, trust chain, verification mechanism implementation, (a not very strong) program obfuscation algorithm, a method to bypass the authorization verification mechanism without destroying the OTA function.
- How to reliably and future-proof crack a* full operating system * software products delivered in the form of Implementation method: pack a dedicated Linux distribution ISO, perform bypass injection on the target system disk, modify necessary files (such as authorization files) and inject the second-stage Payload.
- Advanced usage of bash scripts: color output, multi-process/sub-process monitoring/inter-process communication/output capture, verifying the integrity of containers/mirrors/files in mirrors/files in containers, etc.
- A completely open source Github Enterprise cracking tool!
Locate key information
First, we download the GHE installation package from the official website. As of the deadline for this article (2022.02), the latest version on the official website is 3.4.0.rc1 (the registration machine tool shared later, after many tests, can guarantee that it can run stably on this version).
The official website provides three deployment methods, Hyper-V (VHD), OpenStack KVM (QCOW2), VMWare ESXi/vSphere (OVA). Here I choose the OVA format and deploy it on vSphere. Readers can also import the OVA to VMWare Workstation or Virtualbox for trial use. Be sure to pay attention to resource requirements. When I deployed, I used the configuration of 2CPU, 16G RAM, 200G system disk + 150G data disk, which is officially recommended ( Installing GitHub Enterprise Server on VMware - GitHub Docs ) resource configuration is 4CPU, 32G RAM.
File system and distribution information
After deployment, we are in no rush to enter the system. Start the virtual machine with the Kali boot disk and check the partition status. The system disk is divided into two pieces, which we can regard as A/B partition. Since it is a Linux system, we need to know which distribution it is.
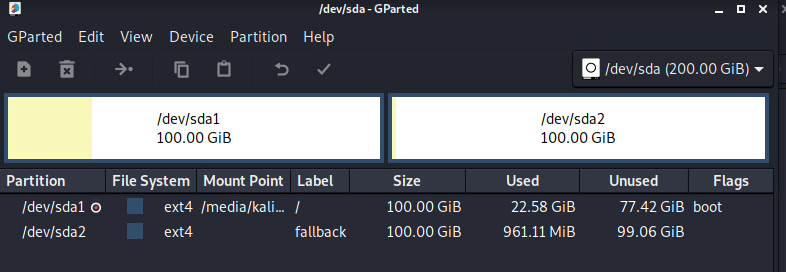
Reading the source code of lsb_release shows that the distribution information is stored in /usr/lib/os-release in the file. Read this file and know that the current system is Debian 10.
$ cat /media/kali/_/usr/lib/os-release
PRETTY_NAME="Debian GNU/Linux 10 (buster)"
NAME="Debian GNU/Linux"
VERSION_ID="10"
VERSION="10 (buster)"
VERSION_CODENAME=buster
ID=debian
...
System Services and Key Directory
Since it is Debian, no matter what service it uses for task scheduling, it must be self-starting through systemd. let’s double /etc/systemd/system/*.target.wants, which will contain the boot items configured by the user (or third-party configuration). It is easy to find that the ghe- The large ticket service at the beginning is very conspicuous, ghe is Abbreviation for Github Enterprise. (In the follow-up analysis, I also found that the nomad service is also very important, which will be discussed later)
I originally thought that Github Enterprise should be referred to as GE for short, and I thought it was weird. Sure enough, the official abbreviation GHE looks a little more comfortable.
$ ls /etc/systemd/system/*.target.wants
/etc/systemd/system/getty.target.wants:
getty@tty1.service

/etc/systemd/system/github-enterprise.target.wants:
graphite-web.service

/etc/systemd/system/multi-user.target.wants:
chrony.service           enterprise-manage.service          grafana-server.service         open-vm-tools.service
console-setup.service    ghe-create-log-dirs.service        haproxy-cluster-proxy.service  rdnssd.service
consul.service           ghe-loading-page.service           haproxy-data-proxy.service     remote-fs.target
consul-template.service  ghe-reconfigure.service            haproxy.service                rsync.service
containerd.service       ghe-secrets.service                lo-enable-ipv6.service         ssh.service
cron.service             ghe-user-disk.service              networking.service             syslog-ng.service
dnsmasq.service          ghe-wait-for-certificates.service  nomad-jobs.service             sysstat.service
docker.service           github-enterprise.target           nomad.service                  ufw.service

/etc/systemd/system/network-online.target.wants:
networking.service

/etc/systemd/system/sockets.target.wants:
dm-event.socket  docker.socket

/etc/systemd/system/sysinit.target.wants:
blk-availability.service  keyboard-setup.service  lvm2-monitor.service  systemd-timesyncd.service
ghe-welcome.service       lvm2-lvmpolld.socket    resolvconf.service    virt-what.service

/etc/systemd/system/timers.target.wants:
apt-daily.timer  logrotate.timer  man-db.timer
Just click on a few services, you can see /usr/local/share/enterprise Seems to be a key directory.
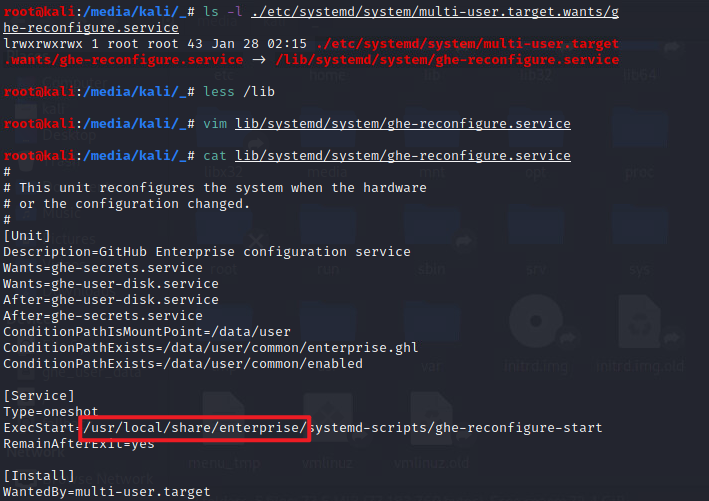
What are these startup items for? We won’t be able to see until it turns on. But in this directory, I found an interesting script /usr/local/share/enterprise/ghe-license-info. You can tell at a glance that this script is equivalent to directly telling us,** Authorization files are installed in ** /data/user/common/enterprise.ghl,** It is a tar file wrapped by gpg. The compressed package contains a file named metadata.json, which contains the registration code information **.
#!/bin/bash
#/ Usage: ghe-license-info
set -e

GHE_LICENSE_FILE=${GHE_LICENSE_FILE:-/data/user/common/enterprise.ghl}

[ "$(whoami)" = "root" ] || [ -r "$GHE_LICENSE_FILE" ] || {
  exec sudo -u root GHE_LICENSE_FILE="$GHE_LICENSE_FILE" "$0" "$@"
  echo Run this script as the root user. >&2
  exit 1
}

if [ ! -f "$GHE_LICENSE_FILE" ]; then
  echo "No license file found ($GHE_LICENSE_FILE)." >&2
  exit 1
fi

info=$(gpg --skip-verify --no-permission-warning --decrypt "$GHE_LICENSE_FILE" 2>/dev/null |
  tar xO metadata.json |
  jq -c 'del(.customer_public_key,.customer_private_key)')

if [ "$1" == "-j" ]; then
  echo "$info"
else
  echo "$info" |
  jq -r 'to_entries | sort[] | "\(.key | tojson) : \(.value | tojson)"'
fi
code obfuscation algorithm
Search for files whose names contain license. Except for some open source licenses of open source components, these files are more conspicuous.
/data/enterprise-manage/current/lib/manage/models/license_settings.rb
/data/enterprise-manage/current/lib/manage/license.rb
/data/enterprise-manage/current/vendor/gems/ruby/2.7.0/gems/enterprise-crypto-0.4.22/lib/enterprise/crypto/license.rb
/data/enterprise-manage/current/vendor/gems/ruby/2.7.0/gems/enterprise-crypto-0.4.22/lib/enterprise/crypto/license_vault.rb
But when you open it, you will find that these files are confused
__ruby_concealer__ "x\x9C]\x9A\xFB[\xDAz\xB3\xF6\xBF9\x90\x84\x9CH
...
+\f\xC1\xF8\xF3\xDD\x84\x82\"\xD9\xF9\x1D\xC00\xA1\xB7mGMp7~|\xD9\xFF\a\xBD\xE1Yb"
Unpacking these files is also easy. After decompressing (zlib inflate) with zlib, use the following strings as Key exclusive-or (XOR) obfuscated strings. Note the trailing space.
"This obfuscation is intended to discourage GitHub Enterprise customers from making modifications to the VM. We know this 'encryption' is easily broken. "
Obfuscation functions are packaged in ruby. No analysis here.
$ strings /usr/local/bin/ruby | grep encryption
This obfuscation is intended to discourage GitHub Enterprise customers from making modifications to the VM. We know this 'encryption' is easily broken.
Use the following script to decrypt.
require 'zlib'

def decrypt(s)
    i, plaintext = 0, ''
    key = "This obfuscation is intended to discourage GitHub Enterprise customers from making modifications to the VM. We know this 'encryption' is easily broken. "

    Zlib::Inflate.inflate(s).each_byte do |c|
        plaintext << (c ^ key[i%key.length].ord).chr
        i += 1
    end
    plaintext
end

content = File.open(ARGV[0], "r").read
content.sub! %Q(__ruby_concealer__), " decrypt "
plaintext = eval content

puts plaintext
The corresponding encrypted script. In fact, we don’t need to encrypt the script, and it’s okay to put it in without encryption after the code is changed. It’s Tu Yile.
require 'zlib'

def encrypt(s)
    i, ciphertext = 0, ''
    key = "This obfuscation is intended to discourage GitHub Enterprise customers from making modifications to the VM. We know this 'encryption' is easily broken. "

    s.each_byte do |c|
        ciphertext << (c ^ key[i%key.length].ord).chr
        i += 1
    end
    Zlib::Deflate.deflate(ciphertext)
end

content = File.open(ARGV[0], "r").read
ciphertext = encrypt(content)
puts "__ruby_concealer__ #{ciphertext.inspect}"
Save this file as /tmp/dec.rb, and use the following bash command to dump all encrypted programs in the GHE system partition (which can be chrooted from Kali Live).
cd /data/enterprise-manage/current
find lib/ -name '*.rb' | xargs -I% sh -c ' mkdir -p /tmp/$(dirname %) && grep -o  __ruby_concealer__ % && ruby /tmp/dec.rb % > /tmp/% || cp % /tmp/%'^C
List of files protected by obfuscation
Searches for.rb files and detects that the file content contains __ruby_concealer__ That’s it. A full list is too long.
Authorization file structure
We have not yet registered the code, and the system has not been started yet, so we have already obtained so much information. According to international practice, we must not complete a registration code?
Just fool an email address and register from the Github Enterprise official website, and then you can apply for a 45-day trial license. Through the previously known file decompression method, we can see the contents inside.
Install GnuPG (windows can install gpg4win) and use gpg to decrypt the ghl authorization file obtained from the official website. It is said to be decrypted, but a password is not actually required. After decryption, use 7-Zip to decompress the tar to get the files inside. You can see that in addition to metadata.json, it also contains two sets of keys.
gpg --skip-verify --no-permission-warning --decrypt github-enterprise-195560.ghl.tar github-enterprise-195560.ghl
github-enterprise-195560.tar
│   metadata.json
├───customer
│       pubring.gpg
│       secring.gpg
└───license
        pubring.gpg
        secring.gpg
The fingerprints of these two keys are exactly the same, and in metadata.json customer_private_key and customer_public_key The field content is exactly the same as the two pairs of keys.

After removing the above two fields, the content of metadata.json is as follows. in the following file Company is the company name I filled in,
{
    "reference_number": "13eb75",
    "company": "Company",
    "ssh_allowed": true,
    "cluster_support": false,
    "croquet_support": false,
    "custom_terms": false,
    "support_key": null,
    "unlimited_seating": true,
    "perpetual": false,
    "evaluation": true,
    "learning_lab_seats": 0,
    "learning_lab_evaluation_expires": null,
    "insights_enabled": false,
    "insights_expire_at": null,
    "advanced_security_enabled": false,
    "advanced_security_seats": 0,
    "seats": 0,
    "expire_at": "2022-03-31T23:59:59-07:00"
}
Doesn’t it mean that I change the content of this JSON, and then use GPG to make a package and put it in?
Right and wrong.
Authorization Check Algorithm
As we all know, GPG is used to verify digital signatures, just like the CA certificate system, it needs to build a complete chain of trust. But CA is centralized, just like the Authority in its name, all users rely on the CA list printed in the operating system to verify the authenticity of each other.
And GPG relies on everyone trusting each other. If A signs B’s certificate, he can trust all the data signed by B’s certificate. But A must check whether B’s certificate is sent through a trusted channel.
And Github’s approach is to hard-code the B certificate in its own code, isn’t it safe?
What a great cleverness!
Then when we generate the authorization file, we need to add a digital signature signed by a trusted key to the authorization file. Of course, only one public key will be stored in the system. In order to generate a signature, we need to generate a private key ourselves and replace the corresponding public key into the system, thus taking over the entire chain of trust.
Smart readers, you must already have ideas here. From here on, I will focus on the results and some key information after sorting out, and the process description will be ignored as much as possible.
Source code to library namespace mapping
| 类名 | 用途 | ruby require | file location |
|---|---|---|---|
| Enterprise::Crypto | 授权文件与 OTA 包读写、验证 | enterprise/crypto | /data/enterprise-manage/current/vendor/gems/ruby/2.7.0/gems/enterprise-crypto-0.4.22/lib/enterprise/crypto.rb |
| Enterprise::Crypto::Vault | 装 key 的容器,每个 key 一个容器,都经过 master key 校验的子 key | enterprise/crypto | /data/enterprise-manage/current/vendor/gems/ruby/2.7.0/gems/enterprise-crypto-0.4.22/lib/enterprise/crypto/vault.rb |
| Manage | 后台主程序,里面初始化了授权模块 | manage | /data/enterprise-manage/current/lib/manage.rb |
| Manage::License | 后台程序里负责授权的模块 | manage/license | /data/enterprise-manage/current/lib/manage/license.rb |
The Manage module is the management background, which is forwarded to nginx and unicorn through haproxy, and accessed from port 8443. This program is the backend program when GHE is installed.
The Crypto module is a public module, and all signature verification, file reading and writing (including decompression of authorization files and OTA package decompression) are performed by this module.
Vault is a key class in the module. This class is responsible for the storage of public and private keys, the signature of the root key, and the verification of fingerprints. Its three subclasses, LicenseVault, CustomerVault, and PackageVault, are responsible for specific functions as the name suggests.
key key
The root key used for signature verification is hardcoded in the following files.
/data/enterprise-manage/current/vendor/gems/ruby/2.7.0/gems/enterprise-crypto-0.4.22/lib/enterprise/crypto/vault.rb
The fingerprint of the root key is E422F81088AE9ABD5A6CBF7D1AF590C895016367,** This fingerprint is the root of trust for GHE **.
pub   rsa4096/1AF590C895016367 2011-08-06 [SC]
      E422F81088AE9ABD5A6CBF7D1AF590C895016367
uid                 [ unknown] GitHub Master Key <support@github.com>
sig 3        1AF590C895016367 2011-08-06  GitHub Master Key <support@github.com>
sub   rsa4096/4ED44822D1ED9253 2011-08-06 [E]
sig          1AF590C895016367 2011-08-06  GitHub Master Key <support@github.com>
The root key signed 3 secondary keys. package is a signed upgrade package, and license is a signature
These three paths are /data/enterprise-manage/current/lib/manage.rb referenced in.
/data/enterprise/package.gpg
/data/enterprise/license.gpg
/data/enterprise/customer.gpg
From the output of gpg, we can see that all three keys contain the signature of the Master Key.
pub   rsa4096/8BDF429EF29F9D7E 2011-08-23 [SC]
      74708F1DFE79BF5FE2DDEC458BDF429EF29F9D7E
uid                 [ unknown] GitHub Customer Key <support@github.com>
sig 3        8BDF429EF29F9D7E 2011-08-23  GitHub Customer Key <support@github.com>
sig          1AF590C895016367 2011-08-23  GitHub Master Key <support@github.com>
sub   rsa4096/FC78CDE72E0420D4 2011-08-23 [E]
sig          8BDF429EF29F9D7E 2011-08-23  GitHub Customer Key <support@github.com>

pub   rsa4096/1E9E2B9CD80BFEB7 2011-08-23 [SC]
      C49B7FA81A0BC6D26DEAC2BA1E9E2B9CD80BFEB7
uid                 [ unknown] GitHub License Key <support@github.com>
sig 3        1E9E2B9CD80BFEB7 2011-08-23  GitHub License Key <support@github.com>
sig          1AF590C895016367 2011-08-23  GitHub Master Key <support@github.com>
sub   rsa4096/4AAC02EA164A2313 2011-08-23 [E]
sig          1E9E2B9CD80BFEB7 2011-08-23  GitHub License Key <support@github.com>

pub   rsa4096/B2B935E31729A28E 2011-08-18 [SC]
      663BE6981E181CC121BC4CADB2B935E31729A28E
uid                 [ unknown] GitHub Package Key <support@github.com>
sig 3        B2B935E31729A28E 2011-08-18  GitHub Package Key <support@github.com>
sig          1AF590C895016367 2011-08-18  GitHub Master Key <support@github.com>
sub   rsa4096/47443DAD9E39C3C3 2011-08-18 [E]
sig          B2B935E31729A28E 2011-08-18  GitHub Package Key <support@github.com>
The public-private key pair contained in the authorization file is signed by the Customer Key.

Overall verification process
The overall verification process is as follows. Take the initialization process of the management background as an example.
-
Manage.setup initializes three Vaults, and reads the content of the original file (all parameters of the new function as an array) into the corresponding Vault internal
key_datamiddle.Enterprise::Crypto.license_vault = LicenseVault.new(license_key) Enterprise::Crypto.customer_vault = CustomerVault.new(customer_key) Enterprise::Crypto.package_vault = PackageVault.new(package_key) -
Perform signature verification operation in Vault (call
decrypt_and_verify)BeforeCrypto.with_vaultWhen the context is initialized, readkey_dataAnd verify the subkey in Vault.-
Enterprise::Crypto.with_vault->Enterprise::Crypto::Vault.open! -
Enterprise::Crypto::Vault.load_master_public_keyWill** Hardcoded master public key blob loaded into GPG ** -
Enterprise::Crypto::Vault.load_vault- Will
key_dataLoad the contents of the GPG one by one, and make sure they have the same fingerprint, save@fingerprintvariable - If the private key is imported (via
@fingerprintvariable query), make sure the private key is signed with the same public keyEnterprise::Crypto::Vault.verify_key_fingerprint! - If the public key is imported (via
@fingerprintvariable query),** Make sure the public key is signed by the master key **Enterprise::Crypto::Vault.verify_key_signature!
- Will
-
Enterprise::Crypto::VaultValidator.validate!Repeat 2.1.2 to verify the key again.
1. `Enterprise::Crypto::Vault.verify_key_fingerprint!` Make sure the master pubkey is the same as** hardcoded fingerprint ** same. 2. `Enterprise::Crypto::Vault.verify_key_signature!` If the public key is imported in step 2.1.2,** Make sure the public key is signed by the master key ** 3. `Enterprise::Crypto::Vault.verify_key_fingerprint!` If the private key is imported in step 2.1.2, make sure the private key is the same as the public key signature -
-
Perform authorization verification, such as license loading or OTA package decompression. Both of the following examples call
Enterprise::Crypto::Vault.decrypt_and_verify# Manage::License @crypto = begin Enterprise::Crypto::License.load(data) rescue Enterprise::Crypto::Error nil end # Enterprise::Crypto::Package def self.extract(package_path, output_path, vault = Crypto.package_vault) tar_file = Crypto.with_vault(vault) do vault.read_package(File.open(package_path)) end from_tar(tar_file.path, output_path) verify_extraction(output_path)
The ones marked in bold above are our breakthrough points. In fact, it is enough to modify two functions in vault.rb.
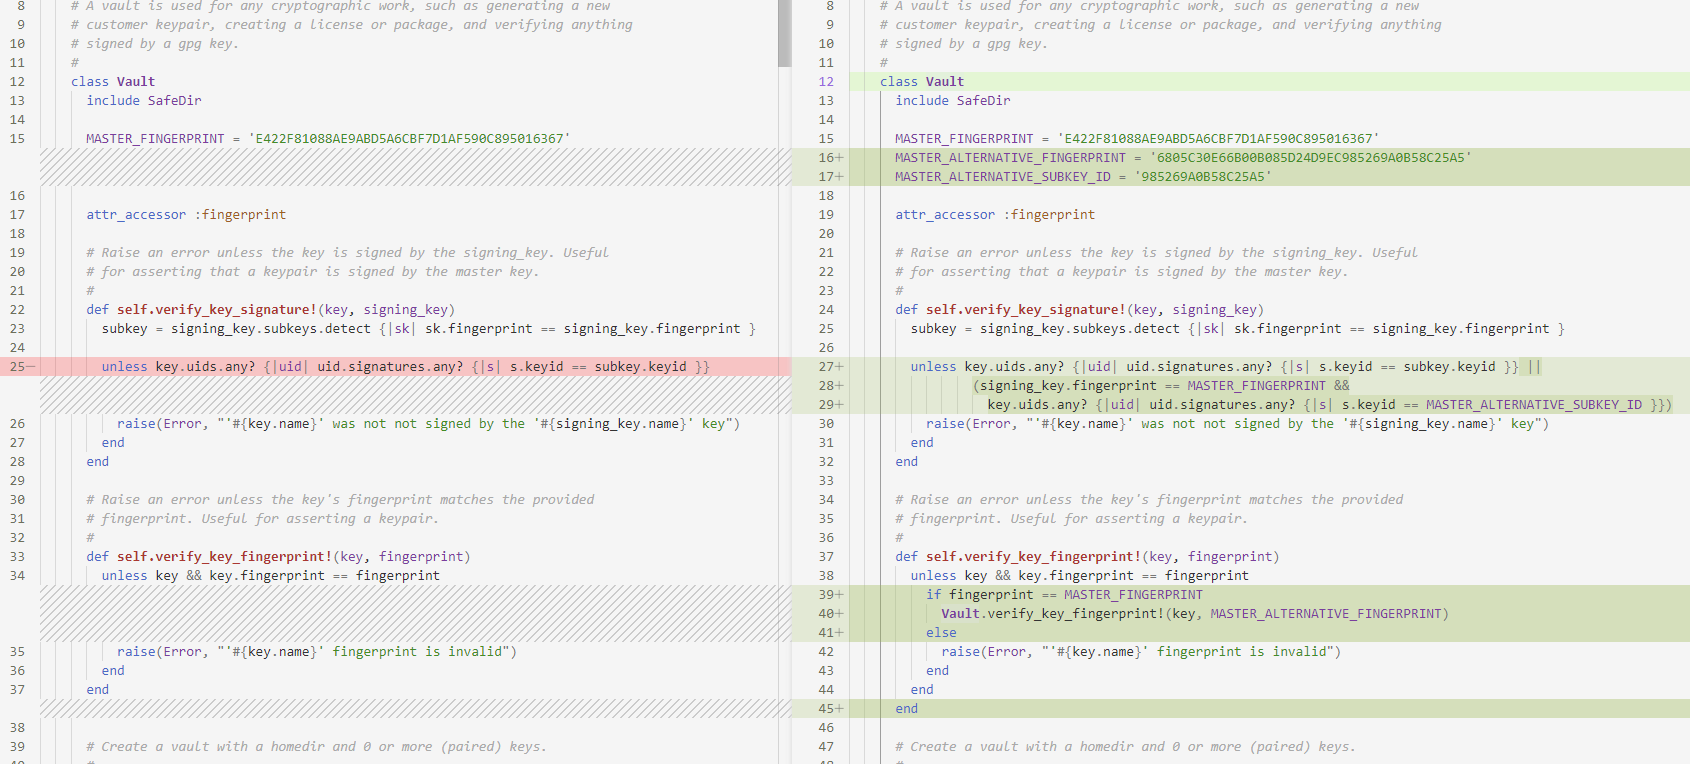
If all checks return True, it is not safe enough. direct modification MASTER_FINGERPRINT If not, this will completely invalidate the online upgrade function, and the downloaded upgrade package will not pass the verification. The method of only inserting the fingerprint does not need to replace the complete master pubkey data, which reduces the amount of patches that need to be changed and facilitates patch generation. This modification method is the most concise and effective.
However, if you modify it like this, you need to fill in the Master Key fingerprint and SubkeyID generated by yourself into the modified vault.rb. Therefore, we need to generate a key before packaging all the patches.
Generate authorization file
Save the following two scripts as keygen.sh and keygen.rb respectively, and copy them together with the vault.rb modified in the previous step into the GHE chroot directory.
Among them, the first script is used to generate the GPG key, and the second script is used to generate the authorization file.
#!/bin/bash
# keygen.sh

script_path=$(cd -P -- "$(dirname -- "$0")" && pwd -P)
key_path="./keys"

GNUPGHOME="$script_path/gpg"

mkdir -p "$GNUPGHOME" && chmod go-rwx "$GNUPGHOME"
mkdir -p "$key_path"

makekey () {
  echo "Creating key for $@" >&2
  gpg --batch --gen-key 2> >(perl -n -e '/\/([A-F0-9]{40}).rev/ && print $1') <<EOF
%no-protection
Key-Type: RSA
Key-Length: 4096
Subkey-Type: RSA
Subkey-Length: 4096
Name-Real: $1
Name-Email: $2
Expire-Date: 0
EOF
}

signkey () {
  echo "Signing $2 with signature of $1"
  printf 'y\nsave\n' | gpg --command-fd 0 --status-fd 2 --local-user "$1" --edit-key "$2" sign
}

exportkey () {
  gpg --export --armor "$1" > "$key_path/$2.gpg"
}

exportseckey () {
  gpg --export-secret-keys --armor "$1" > "$key_path/$2.gpg"
}

mkey=$(makekey "Github Master Key" "test@github.com")
lkey=$(makekey "Github License Key" "test@github.com")
ckey=$(makekey "Github Customer Key" "test@github.com")


set -x
signkey "$mkey" "$lkey"
signkey "$mkey" "$ckey"


exportkey	"$mkey" master
exportseckey	"$mkey" master_sec
exportkey	"$lkey" license
exportseckey	"$lkey" license_sec
exportkey	"$ckey" customer
exportseckey	"$ckey" customer_sec
keygen.rb calls GHE internal modules to generate authorization files.
# keygen.rb
# frozen_string_literal: true
require "enterprise/crypto"


def main()
  license = generate_example_license(0, Time.now + days, license_metadata)
  File.open(ENV["LICENSE_FILENAME"] || "license.ghl", "wb") { |f| f << license.to_bin }
end

def generate_example_license(seats, expire_at, metadata = {})
  customer_sec_key = File.read("keys/customer_sec.gpg")
  customer_pub_key = File.read("keys/customer.gpg")
  license_sec_key  = File.read("keys/license_sec.gpg")
  license_pub_key  = File.read("keys/license.gpg")

  name  = ENV["LICENSE_NAME"] || "Test User"
  email = ENV["LICENSE_EMAIL"] || "test@example.com"

  Enterprise::Crypto.customer_vault =
    Enterprise::Crypto::CustomerVault.new(customer_sec_key, customer_pub_key, blank_password: true)

  Enterprise::Crypto.license_vault =
    Enterprise::Crypto::LicenseVault.new(license_sec_key, license_pub_key, blank_password: true)

  customer = Enterprise::Crypto::Customer.generate(name, email)
  license = customer.generate_license(seats, expire_at, support_key, metadata)
end

def license_metadata
  company            = ENV["LICENSE_COMPANY"] || "Baidu Inc."
  ref_number         = ENV["LICENSE_KEY_REFERENCE_NUMBER"] || "0b634b"
  license_ref_number = ENV["LICENSE_REFERENCE_NUMBER"] || "2df6d8"
  order_ref_number   = ENV["LICENSE_ORDER"] || "81e4b7"

  {
    reference_number: ref_number,
    order: order_ref_number,
    license: license_ref_number,
    company: company,
    ssh_allowed: true,
    support_key: support_key,
    cluster_support: true,
    advanced_security_enabled: true,
    unlimited_seating: true,
    perpetual: true
  }
end

def seats
  (ENV["LICENSE_SEATS"] || 100).to_i
end

def days
  60 * 60 * 24 * (ENV["LICENSE_DAYS"] || 365 * 10).to_i
end

if __FILE__ == $0
  main()
end
Don’t rush to run. After copying the file, remember to mount /dev. When generating a key, you need to call the random number generator in this directory. Enter the chroot shell and run keygen.sh
GHE_ROOT=/media/root/_

cp keygen.sh keygen.rb "$GHE_ROOT/root/"
mount /dev $GHE_ROOT/dev
chroot $GHE_ROOT bash

# 在 chroot shell 内
export SHELL=/bin/bash PATH="/usr/share/rbenv/shims:$PATH" RBENV_VERSION=$(cat /etc/github/ruby_version) GEM_PATH=/data/enterprise-manage/current/vendor/gems/ruby/2.7.0
cd /root/
bash keygen.sh
After running keygen.sh, the keys subdirectory under the current directory will contain the public and private keys of master and two pairs of subkeys, customer and license.
Use the gpg command to get the Master Key fingerprint and SubkeyID, taking the pair of keys I generated as an example, the fingerprint is 6805C30E66B00B085D24D9EC985269A0B58C25A5, the SubkeyID is 985269A0B58C25A5.
$ ls keys/
customer.gpg
customer_sec.gpg
license.gpg
license_sec.gpg
master.gpg
master_sec.gpg

$ gpg --with-fingerprint --keyid-format LONG --import-options show-only --import ./keys/master.gpg
pub   rsa4096/985269A0B58C25A5 2022-02-17 [SCEA]
      Key fingerprint = 6805 C30E 66B0 0B08 5D24  D9EC 9852 69A0 B58C 25A5
uid                            Github Master Key <security@github.com>
sub   rsa4096/D633FCD383735413 2022-02-17 [SEA]
Fill these two data into the modified vault.rb, and copy it to the location of the original file (the verification can only pass after patching it). Then fill in the appropriate parameters through the environment variable and run keygen.rb.
have to be aware of is, LICENSE_NAME The value of will be used as the company name displayed on the GHE interface, and there is no way to modify it after the authorization file is created.
ruby enc.rb vault.rb > vault.enc.rb  # optional
cp vault.enc.rb /data/enterprise-manage/current/vendor/gems/ruby/2.7.0/gems/enterprise-crypto-0.4.22/lib/enterprise/crypto/vault.rb

LICENSE_NAME="Known Rabbit" \
LICENSE_EMAIL="sales@github.com" \
LICENSE_COMPANY="KR" \
LICENSE_KEY_REFERENCE_NUMBER=$(dd if=/dev/urandom bs=1 count=3 | xxd -ps) \
LICENSE_REFERENCE_NUMBER=$(dd if=/dev/urandom bs=1 count=3 | xxd -ps) \
LICENSE_ORDER=$(dd if=/dev/urandom bs=1 count=3 | xxd -ps) \
ruby keygen.rb
After running, a license.ghl will be generated in the directory, because we call the authorization file created by GHE’s own code, so as long as the file is successfully created, the file must be verified as a valid authorization file by GHE. Copy this file and use it later.
files to overwrite
In general, we need to overwrite our modified vault.rb to all places where this file is called.
Due to the complexity of the overall architecture of GHE, the location we covered before can only ensure that we can successfully pass the initial setup of GHE (management background service on port 8443). Most of GHE’s services live inside Docker containers, and Nomad is responsible for the lifecycle management of these services.
File location in rootfs:
# Patch Management Console
/data/enterprise-manage/current/vendor/gems/ruby/2.7.0/gems/enterprise-crypto-0.4.22/lib/enterprise/crypto/vault.rb
Among them, the container with verified authorization information includes github-env-<RANDOM_UUID> (which is used by GHE to run database schema migrations during initialization) and github-unicorn-<RANDOM_UUID> (GHE front-end Web service), where RANDOM_UUID is randomly generated each time the service starts, once the program inside is closed ( docker stop), it will be automatically deleted by nomad ( docker rm) and create a new container. So the file must be overwritten in the image for cracking. In the current latest version 3.4.0.rc1, the container image is named github:4780f0371bdde4e035b372fdd8f373c11a3ef9c2. Vault file location inside the container:
/github/vendor/gems/2.7.1/ruby/2.7.0/gems/enterprise-crypto-0.4.23/lib/enterprise/crypto/vault.rb
nomad will invoke /usr/local/share/enterprise/ghe-docker-load-images,pass docker load method to load the image backup located at /data/user/common/ghe-config.log
/data/docker-images/github:4780f0371bdde4e035b372fdd8f373c11a3ef9c2#sha256:c837ca7816c67152409c4f5446d0061e9d5b6329d6cd0d62bc504c0df416adc7.tar
Therefore, either delete the image backup file so that the system cannot overwrite the image we patched. Or patch this image backup as well. There are many details involved in patch image backup, so I won’t repeat them here. For specific methods, please refer to the installation script in my registration machine.
Packaging and encapsulation of the keygen - “Cracking the dedicated operating system”
The biggest difference between cracking GHE and other software is that the software itself is distributed as a complete operating system.
To crack a PE file, we only need to change a few assembly statements. To crack a Docker container, we only need to bind the patch file into it. But what about hacking an operating system? If we want to crack an operating system before it even boots, then magic can defeat magic—another operating system to crack it.
Now quiz you, what is the smallest Linux distribution?
Arch Linux?
No, no, that thing is too big, the Live CD is more than 600 megabytes, and after I streamlined it, the minimum is 480M. Alpine Linux may be reliable, but we generally use it as the bottom package of the container, and the packaged kernel is more than 100 megabytes.
Now we invite Slitaz Linux to the podium. Slitaz Linux That’s awesome. The entire rootfs is 29M before compression, plus the Linux kernel is compressed together, the output ISO is only 16M!
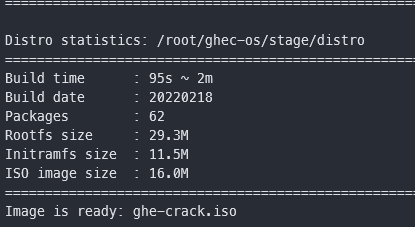
This is the basic image suitable for making our “cracking dedicated operating system”. We named it ghec-os (** G ** it** h ** ub** E ** enterprise** C ** rack** OS ** )
Slitaz Linux provides an ISO customization tool called Tazlito. In short, we only need to use it to generate a template (flavor), fill in the additional files we added in the template according to the directory structure, and fill in the configuration file The packages we need to add can be. The overall process described in the official document is as follows
Tazlito automates the process of building a customized ISO, and the method is quite straight-forward:
- find a template (flavor) to work on ($ tazlito list-flavors)
- download the template ($ tazlito get-flavor flavor_name)
- look at the flavor’s packages ($ tazlito show-flavor flavor_name)
- extract the flavor ($ tazlito extract-flavor flavor_name)
- put in a rootfs folder (make one by copying in files from /etc/ to /home/slitaz/distro )
- add additional files using the folder /home/slitaz/distro/addfiles (optional)
- change options ($ tazlito configure)
- create the ISO image ($ tazlito gen-distro)
- burn to CD or USB stick ($ tazusb gen-iso2usb)
The process of packaging ghec-os is also a long process of encountering and solving various problems.
In short, in ghec-os, I added a program (crack.sh) to modify the root file system of GHE on the basis of the official base flavor. This program replaces the root key, the intermediate key and the other The program (crack-step2.sh) injects the GHE startup item, detects the container after Nomad starts the Docker container, cracks the container image and container image backup as needed, and displays the real-time status on the VM terminal (uncracked, partially cracked , cracking in progress, successful cracking pending restart, cracked).
In addition, I also modified the default user password to root:root, modified the motd login prompt information, and added a soft link in the/usr/bin directory, so that after logging in to the root user, run directly crack The cracking can be completed.
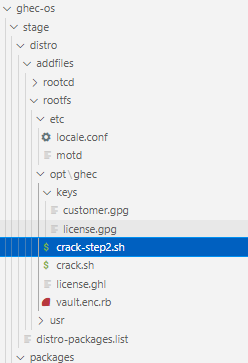
Summary of some problems encountered in the packaging process:
- The package manager of the Slitaz system installs the source domain name, 114dns cannot resolve it, and it can be resolved by replacing it with Ali DNS
- A package named linux-scsi must be added when packaging. The SCSI controller used by VMWare needs the driver in this package, otherwise the disk cannot be recognized.
- run
tazlito gen-distromust be added whenstripped=1Environment variables, this is a bug of tazlito, otherwise the package list in distro-packages.list cannot be recognized normally. - distro-packages.list This file cannot contain blank lines, otherwise it will crash when building the ISO. in the name
-Packages with a minus sign cannot be at the end of the list and need to be inserted in the middle.
In the process of writing cracked Shell scripts, I also encountered a lot of challenges. Friends who have the following questions like me can extract the program in the registration machine by themselves and see how I achieve the following requirements.
- When there is no bash and no tput, how to display colored text in the Shell?
- How to verify the integrity of a file? How to verify the integrity of a single file in a container? How to verify the integrity of individual files within an image? How to verify the integrity of a mirror as a whole?
- How to implement multi-process with Bash? How to realize the state monitoring of child process? How to pass messages between processes and functions? How to maintain program state, capture output and subprocess status code like systemd?
- How to guarantee a stable program state? For example, against the update of the target program, it will not crash after cracking, and ensure the consistency of the results when the cracking program is run multiple times (avoiding backups being overwritten, double patching, etc.).
The registration machine is done, let’s briefly talk about how to use it.
Use of keygen
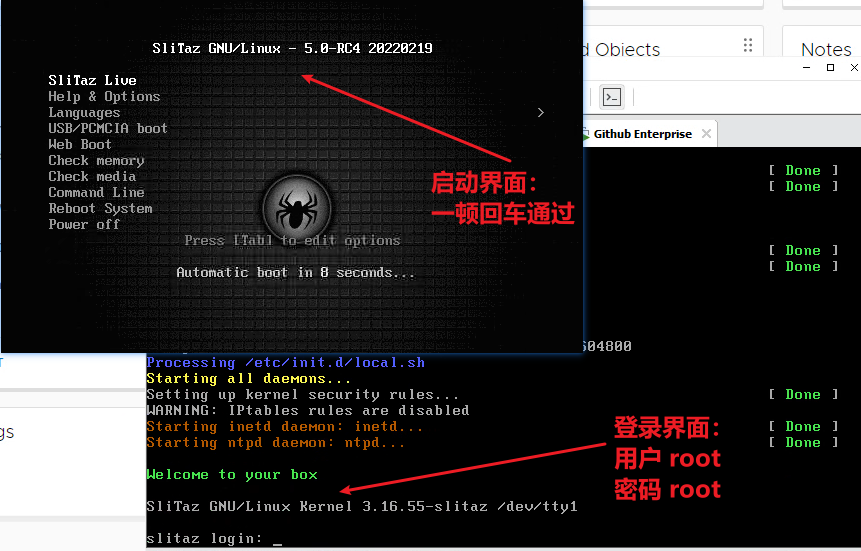
After importing GHE’s OVA according to the official tutorial, set CDROM as the priority boot item in the virtual machine BIOS, enter the Slitaz Linux boot interface, and press Enter to enter the system.
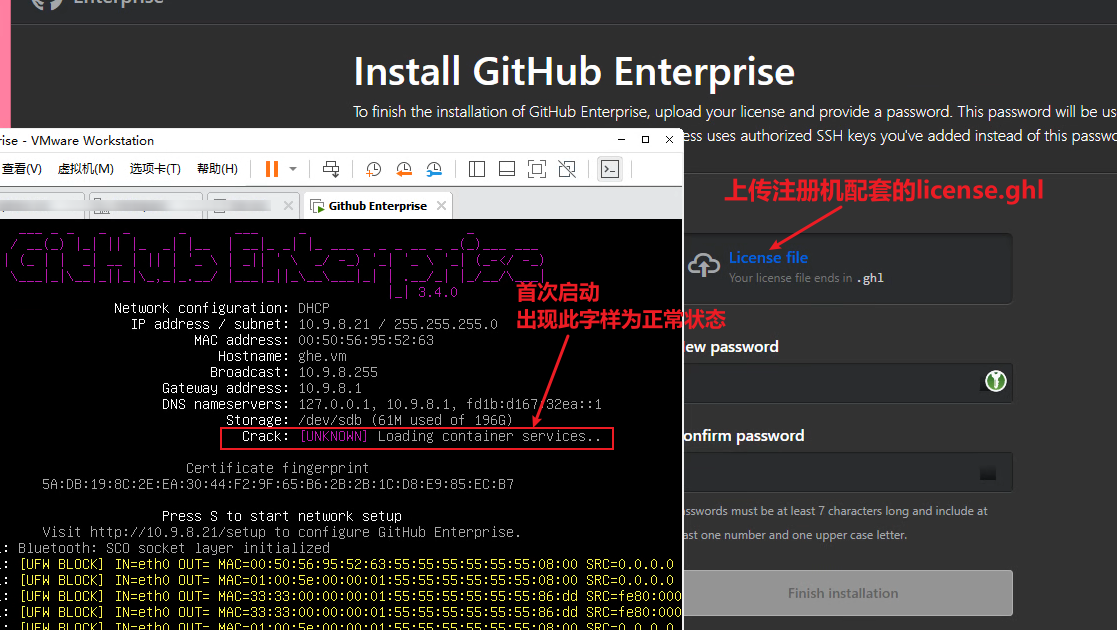
After logging in, run the command crack. Before the first operation, the user will be prompted to confirm, just enter y and press Enter.
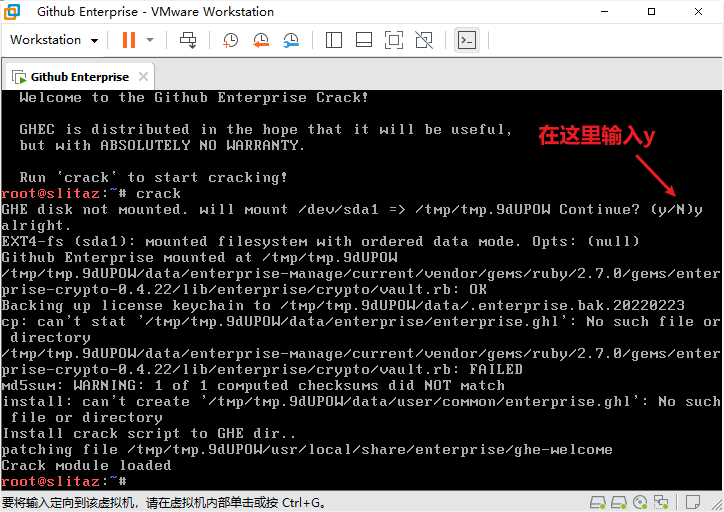
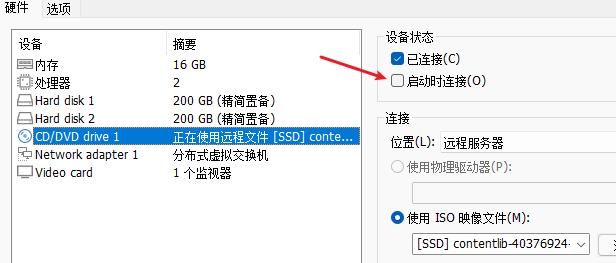
Run to the end and prompt Crack module loaded. In the virtual machine settings, cancel the option of “connect at startup” for the optical drive. Then restart the virtual machine.
After restarting, visit the IP of GHE, upload the license and complete the initial configuration for the first time.** It is strongly recommended to add an SSH Key when initializing the configuration ** , so that when something goes wrong later, you can go in and look at the log.
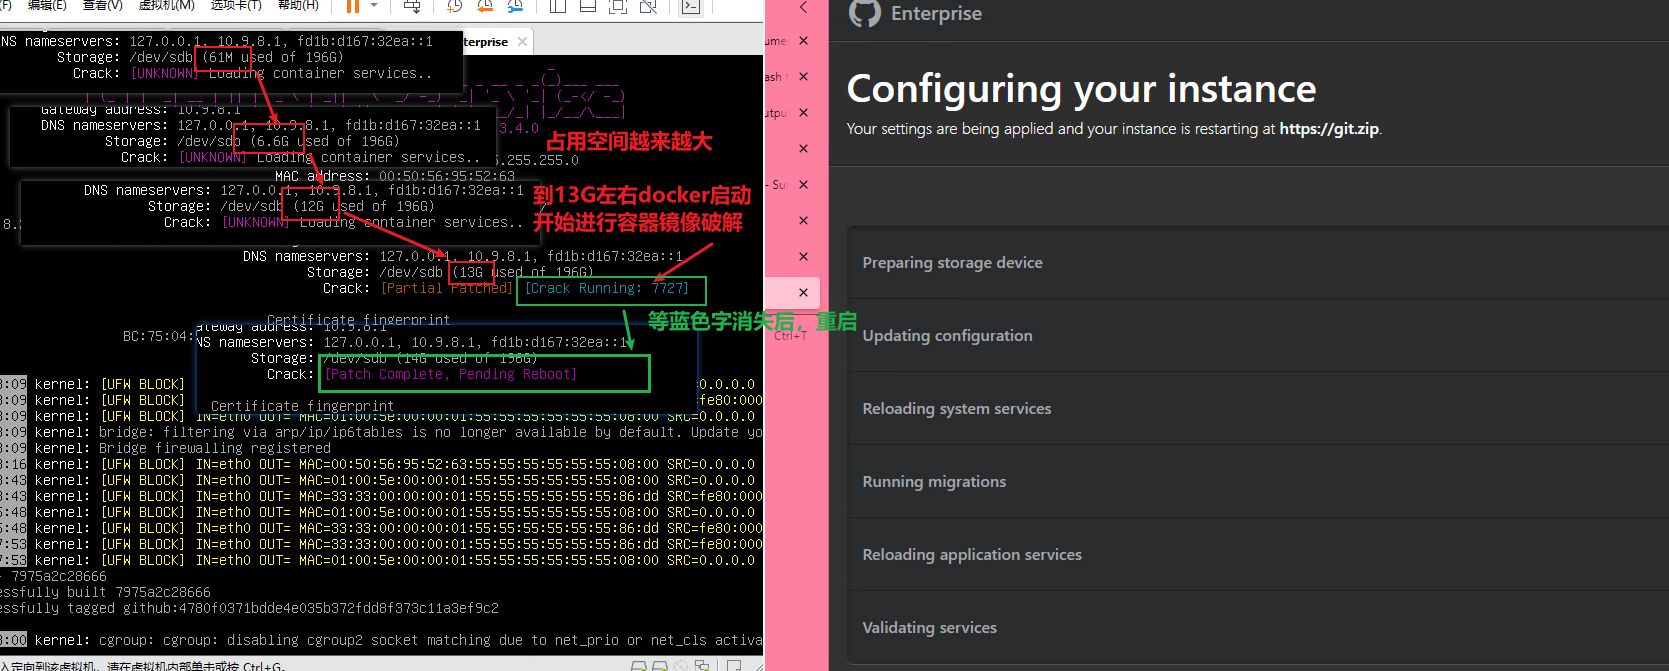
After completing the initial configuration, you will enter the waiting interface on the right side of the figure below. At this time, you can notice that the occupied space displayed in Storage will become larger and larger. At this time, GHE is decompressing the docker image. When the space grows to about 13G, GHE will start all docker containers to start the database structure migration. At this time, the registration machine starts to crack the docker image, and at the same time displays a line of blue words indicating the running status and the PID of the child process.
When the cracking operation is completed, select “Restart Client” in VMWare, and do not force restart. On the right, it will run to Running migrations. Don’t wait for it to finish running, it will report an error if you don’t restart it.
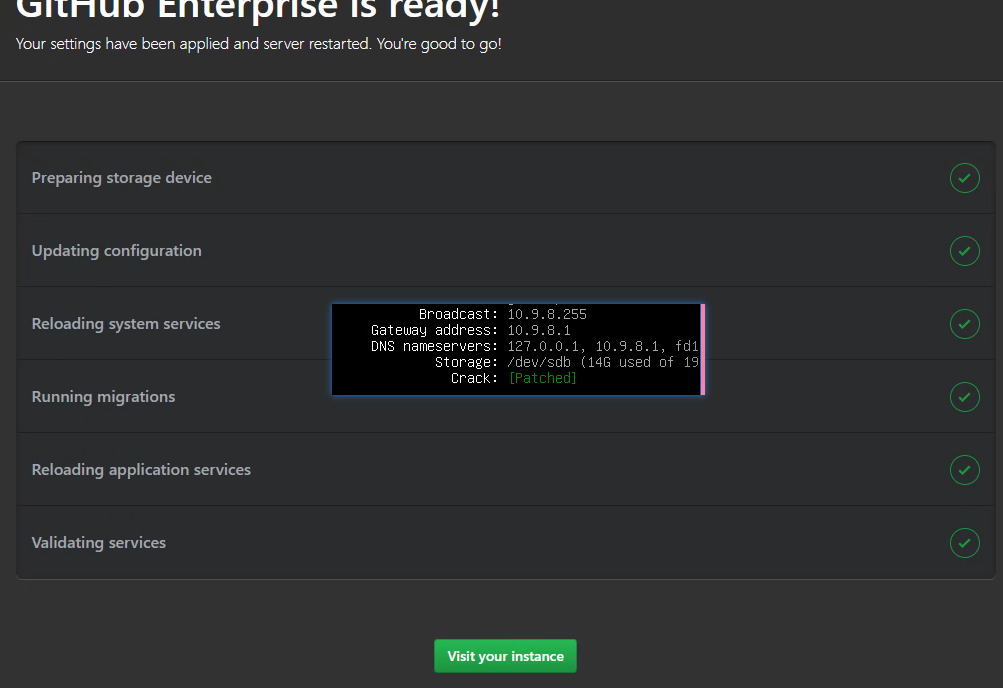
After restarting, GHE will continue to run the configuration process. Just wait. If everything is normal, the configuration page and the terminal are all green.
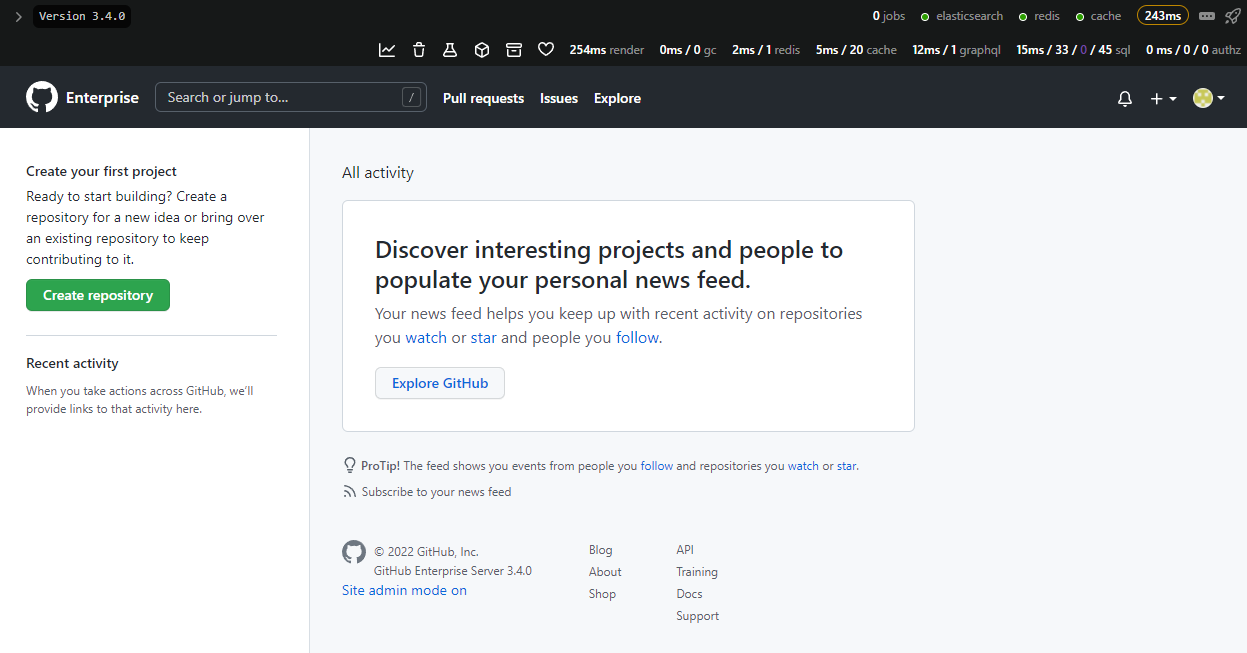
Then click Visit your instance to see the main interface!
About obtaining the keygen: follow Wechat official account Rabbit Unknown, and enter the secret word: ghec-os To get the download address. md5sum:
8c053c113054c4d2e089b2192e393147 ghe-crack.iso
Conclusion
GHE is a product full of ambitions, from simple Git hosting at the beginning, to CI/CD (Actions), Package Repo, Discussion, Security Advisory, and now a full-featured on-premise version. In the process of trying GHE, from a product point of view, Microsoft must be committed to making it a strong competitor of Gitlab EE. I personally think that Github Actions is an era ahead of Gitlab CI/CD Pipelines.
Interestingly, the main framework of Github Enterprise is written in ruby, but the Github Actions part is written in C# and Powershell. It seems that it is the product of Microsoft’s acquisition.
While enjoying all the convenience brought by Github, objectively speaking, I also found that GHE also has many, many problems.
-
The whole system is very unfriendly to operation and maintenance personnel.
- It is very inconvenient to read the log. All services run in Docker, but the logs are not in Docker logs, and are scattered in various directories. There is no official documentation.
- There is no way to configure the switch and instance scaling of each component. For example, even if the Actions function is not used, the docker service in the background will not be closed.
- With Docker, the service scheduling is not the common compose, swarm, k8s, but nomad.
-
resource usage** Extremely exaggerated ** , it takes up 15G memory and 70G hard disk when booting, and the disk write volume is 10G after 12 hours of operation—this is the case where there is no project in the example.
-
Unbearable little bug.
- The database does not seem to have time zone support, and HTTP 500 crashes when accessing all time-related settings (scheduled reminders, time-limited personal status, etc.). Why don’t foreigners deserve it?
- Github Actions and Packages functions require S3 Storage, but analyzing the Powershell script in the container reveals that a region code is hard-coded in the deployment service
us-east-1Causes an infinite loop in the Action deployment process. Why don’t foreigners deserve it? - Modifying any configuration requires restarting all services, and the restart time is calculated in hours. The longest one took 12 hours. This kind of down time is afraid that the phone calls of operation and maintenance will be blown up.
-
The back end is stitched together by Ruby and C#. Although the front end seems to be quite integrated, running the two databases MySQL + MSSQL directly leads to a soaring memory usage, and the MSSQL service will gradually fill up the memory over time (16G ). Really have your MS.
-
It supports enterprise internal CA (manually importing certificates), but does not support private ACME services within the enterprise. It can be done by modifying the hard-coded ACME server address in the script, but isn’t LetsEncrypt used all over the world?
The last thing I want to say is,** For personal use, unless there is an organic room at home, the productivity improvement benefits brought by the function itself are far from worth the cost of computing/storage resources (including electricity bills) ** . I share this registration machine with you, and I also hope that through learning (bai) learning (piao) it together, I have the opportunity to raise bugs to Microsoft, maybe it can be optimized and optimized!